MetalKit Part.4
上一次我們看了一些基礎 Metal Shading Language。
在我們進入更進階的主題前,我只是覺得現在是重新審視我們迄今學到的好時機,我承認特別是對 graphics pipeline 這點,
I might have gone too fast on that topic
(thank you, anonymous reader, for your suggestion and valuable feedback!)
讓我們更詳細看一下 graphics pipeline,且這邊我會以一段故事開始。
所有事大概在十年前左右發生(It all started about a decade ago),當著色器被引入給開發者 能夠影響固定的 pipeline 就存在在那之前
when shaders were introduced as a way for programmers to be able to influence the fixed pipeline that existed until then.
在同時, GPUs 推出支援浮點數,加速了 GPGPU (general-purpose computing on graphics processing units) 的誕生.
最後導致,一個新的可編程 pipeline 顯著的改變了:
如你所見,現在新的 pipeline 有兩個 shader 階段,且那就是我們可以寫客製 code 給 GPU 執行。
The first part of a graphics program always runs on the CPU and is often called host code.
這邊是大多的資源分配發生的地方,as well as staging the data transfer to and from the GPU.
對編程的最重要的部分, 然而, 他執行在 GPU.
兩個 shaders 分離到 x.metal file(在其他 GPGPU 架構,如 OpenCL,叫 kernel code)。
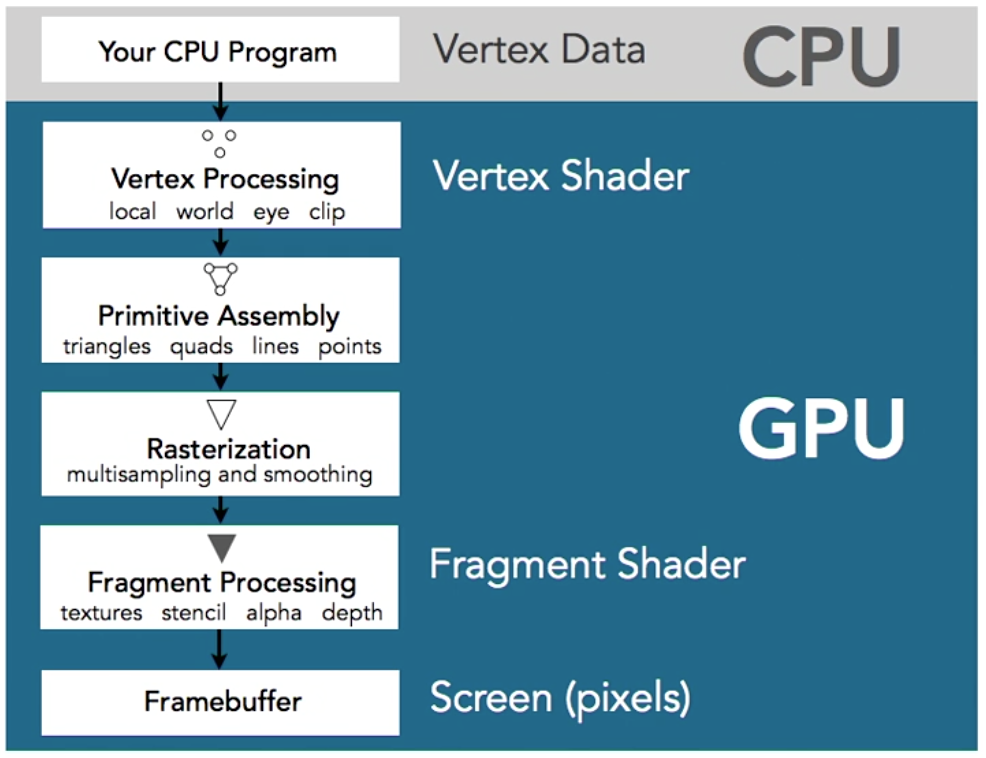
pipeline 從 cpu 階段開始,輸入 vertices 型式給 GPU。
They undergo transformation and per-vertex lighting.
在這個點 vertex shader 可用於預先把 vertices 光柵化(rasterization)處理
At this point the vertex shader can be used to manipulate the vertices prior to rasterization.
After that, vertices undergo clipping and rasterization resulting in fragments.
fragment shader can then be run on each fragment before the pixel values are output to the framebuffer for display.
Now let’s look at Metal’s own pipeline. We will refer back to the part 2 source code and we’ll mention line numbers to exemplify the concepts we touch. Building a Metal application is done in two stages. The first one is the Initialization stage:
The very first step is getting the device (line 19 in MetalView.swift). A device is the direct connection to the GPU driver and hardware; it’s the source we need to create all the other objects in Metal. The second initialization step is creating a command queue (line 40) which is our channel to submit work to the GPU. The third initialization step is creating the buffers, textures and other resources (lines 20-27). The newBufferWithBytes function will allocate a new block of shared memory, copy the provided pointer into it, and return a handle to that buffer. The fourth initialization step is creating the render pipeline (lines 28-37) which is a chain of steps that start with taking vertex data from one end and producing a rasterized image on the other end. The pipeline consists of two elements: the descriptor which holds the shader information and the pixel format, and the state which is built from the descriptor and contains the compiled shaders. The fifth (last) initialization step is creating a view. For us it was easier to inherit from MTKView (line 11) rather than creating a new CAMetalLayer and adding it as a subview.
Next, let’s look at the second stage of building a Metal application, the Drawing stage:
The very first step is getting the command buffer (line 40). All of the work that goes to the GPU will be enqueued into this buffer. We need the command queue from the previous stage to have a command buffer created. The second step is setting up a render pass (lines 38-39). A render pass descriptor tells Metal what actions to take while an image is being rendered. Configuring it requires that we specify what color textures are we rendering to (the currentDrawable texture). We need to also choose which color the screen will be cleared to before we draw any geometry. The third step is the actually drawing (lines 43-44). We specify the buffer where the vertices are stored and then the primitives we need drawn. The fourth and final step is to commit the command buffer (lines 46-47) to the GPU. When calling commit, the command buffer gets encoded, sent to the end of the command queue, and executed on the GPU when its time comes.
I hope this part of the tutorial brought more clarity to understanding general topics such as the graphics pipeline and the Metal pipeline. I look forward to returning back to more coding in the next part of this tutorial.
Until next time!