Repo來源:CustomView
Live Render是IOS8之後才特有的功能,它提供了將你的Code可以在Storyboard上面即時的顯示,而不用再runtime的時候才能看見
- Creating a Custom View that Renders in Interface Builder
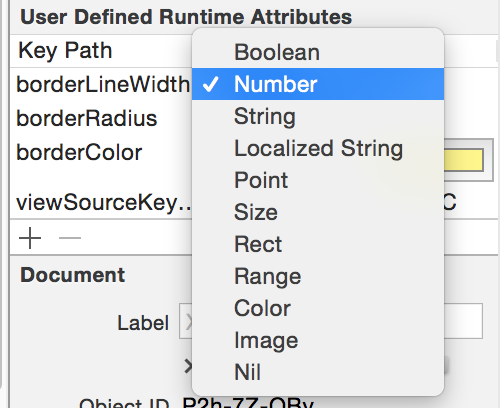
- By using the IBInspectable attribute to declare variables as inspectable properties, you allow Interface Builder to quickly rerender your custom view as you change the values of these properties in the Attributes inspector. You can attach the IBInspectable attribute to any property in a class declaration, class extension, or category for any type that’s supported by Interface Builder’s defined runtime attributes: boolean, integer or floating point number, string, localized string, rectangle, point, size, color, range, and nil.
- If you need to create code for a custom view that runs only in Interface Builder, call that code from the method prepareForInterfaceBuilder. For example, while designing an app that uses the iPhone camera, you might want to draw an image that represents what the camera might capture. Although its compiled for runtime, code called from
prepareForInterfaceBuildernever gets called except by Interface Builder at design time. - You can use the preprocessor macro
TARGET_INTERFACE_BUILDERto specify code for inclusion with or exclusion from your custom view class.
簡而言之,Live Render能使用的資料型態就是User Defined Runtime Attributes所能提供的資料型態。
Quick Link
- Live Render Ver.Objetive-c (IOS 8)
- Live Render Ver.Swift (IOS 8)
- Swift live render(use didset)How to make awesome UI components in iOS 8 using Swift and XCode 6
Live Render Ver.Objetive-c (IOS 8)
Related Documents
Step 1 非常非常重要
- 建立framework.
- File -> New -> Target…
- IOS -> Framework & Library -> Cocoa Touch Framework
Step 2
- 建立一個繼承自UIView的CustomView類別
Step 3
- 在你的類別中加入
IB_DESIGNABLE
1 |
|
Step 4
- 加入一些property,並且帶有
IBInspectable
1 |
|
Step 5 (分支 1)
- 實作
drawRect方法
1 | - (void)drawRect:(CGRect)rect |
Step 5 (分支 2)
- 實作
initWithCoder&initWithFrame方法
1 | @interface YourCustomView(){ |
Step 6 (分支 2)
- 實作 live render 方法(
prepareForInterfaceBuilder&drawRect)
PS : some strange with live render方法.(我晚點會在這個地方解釋 Live Render Flow)
1 | -(void)prepareForInterfaceBuilder{ |
Live Render Ver.Swift (IOS 8)
Related Documents
Step 1 非常非常重要
- 建立 framework.
- File -> New -> Target…
- IOS -> Framework & Library -> Cocoa Touch Framework
Step 2
- 建立一個繼承自UIView的CustomView類別
Step 3
- 在你的類別中加入
@IB_DESIGNABLE
1 | import UIKit |
Step 4
- 加入一些instance variable,並且帶有
@IBInspectable - 並且實作建構子,
init(coder : NSCoder)&init(frame: CGRect)
1 | import UIKit |
Step 5
- 複寫
drawRect方法
1 | override func drawRect(rect: CGRect) |
Live Render Flow
| APP running | Debug Selected Views( Live Rendering) |
Function | |
|---|---|---|---|
| path | initWithCoder:┋ ┋ ┋ ┋ ⬇︎ drawRect: |
initWithFrame:┋ ⬇︎ prepareForInterfaceBuilder┋ ⬇︎ drawRect: |
init method Live Render 1 Draw |